JavaScript in 3D PDF- basic
I have had a few attempts at this before and have given up. I find that the Adobe site is so unhelpful that I never get anywhere. There must be a large resource out there for scripts for using inside 3D PDF’s but they do not seem to be shared around. The helpers on posts are pretty cryptic, a bit like the OpenMaint crowd. They purport to help, but dont, and mainly hinder.
Anyway, I watched a few videos on using JavaScript in 2D forms, dealing with simple processes. This was about my level for starting off.
The videos got my enthusiasm up and I decided to have another crack at making java Scripts work inside of 3D PDFs.
So I went searching on the web for some snippets that would do some basic stuff for me, I did find the link to the JavaScript 3D API reference doc and of course that confused me no end. I just copy/alter existing code, so the references were not that much help. Anyway, after a lot of buggering about I finally got a bit of code to work.
What was not in the reference doc were examples so you could see the structure that you needed to follow, There was an earlier reference but the one above does have a couple of basic examples that you can use to test out.
The first issue i had was how to select an object inside the 3D PDF using JavaScript? The PDF has a 2D area/page and a 3D area inside that. So you need to reach into the 3D area to get the objects that you want. So on Page 9 in the introduction it shows:
The following example illustrates how to access the 3D JavaScript engine. In this example, a button (or link) contains JavaScript code that rotates the U3D object named "Axes".

// Get index of page containing the Annot3D object (count starts at 0).
pageIndex = this.pageNum;

// Index of the Annot3D (count starts at 0).
annotIndex = 0;

// Get a reference to the Annot3D script context.
c3d = this.getAnnots3D( pageIndex )[ annotIndex ].context3D;

// Get a reference to the node in the scene named "Axes".
axes = c3d.scene.nodes.getByName( "Axes" );

// Rotate the object about the X-Axis PI/6 radians (30 degrees).
axes.transform.rotateAboutXInPlace( Math.PI / 6 );
So you have to first get the page you want, then the Annot3D object ( I suppose you could have multiple 3D areas on a page) and the you need the context3D . So a lot of JavaScript code starts with:
getAnnots3D(0)[0].context3D.xxxxxxxYou then choose the next level down, until you get to the specific object that you are looking for.
Process- Turn Objects Off/On-part 1
What I wanted was some simple code that would turn an object in the 3D PDF off or on, like, a Roof say. I’d work in Adobe Acrobat Pro, make a button and attach a bit of JavaScript to that button.
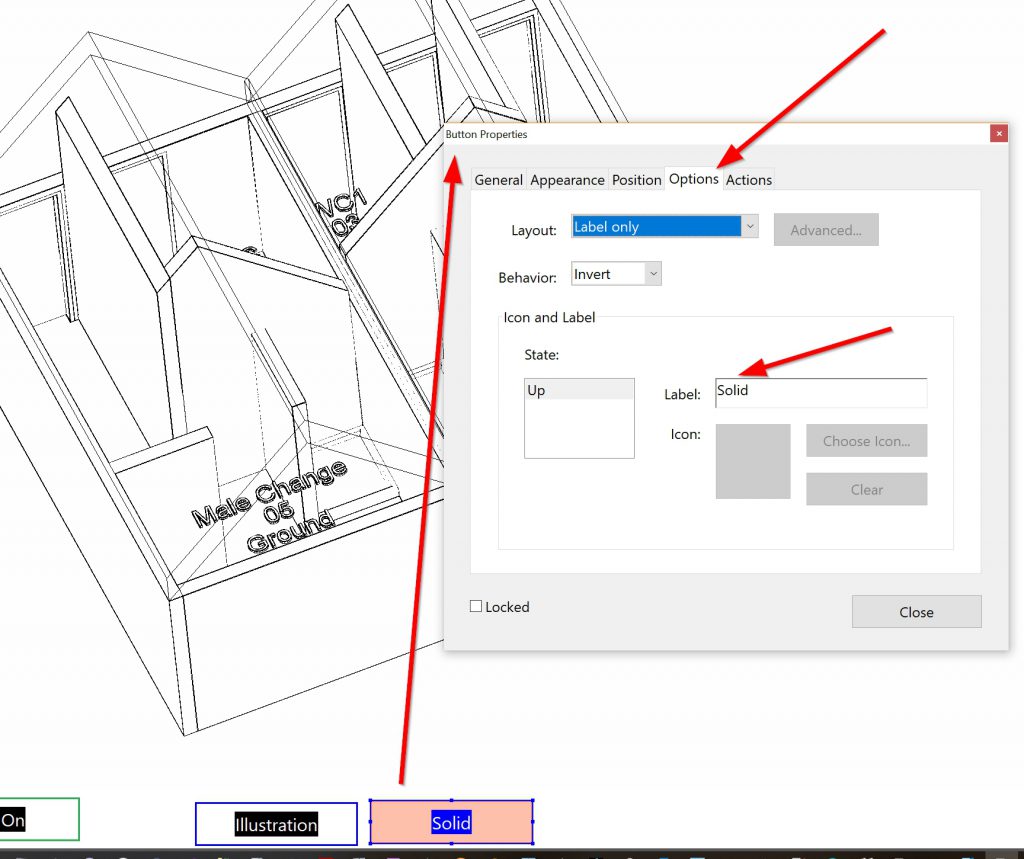
Setting up the button was easy enough, apart from the TEXT DISAPPEARING. Then I realised that I needed to go to the Options tab and give it a label, then that would appear on the button. Not exactly obvious but once you know its easy enough to do.
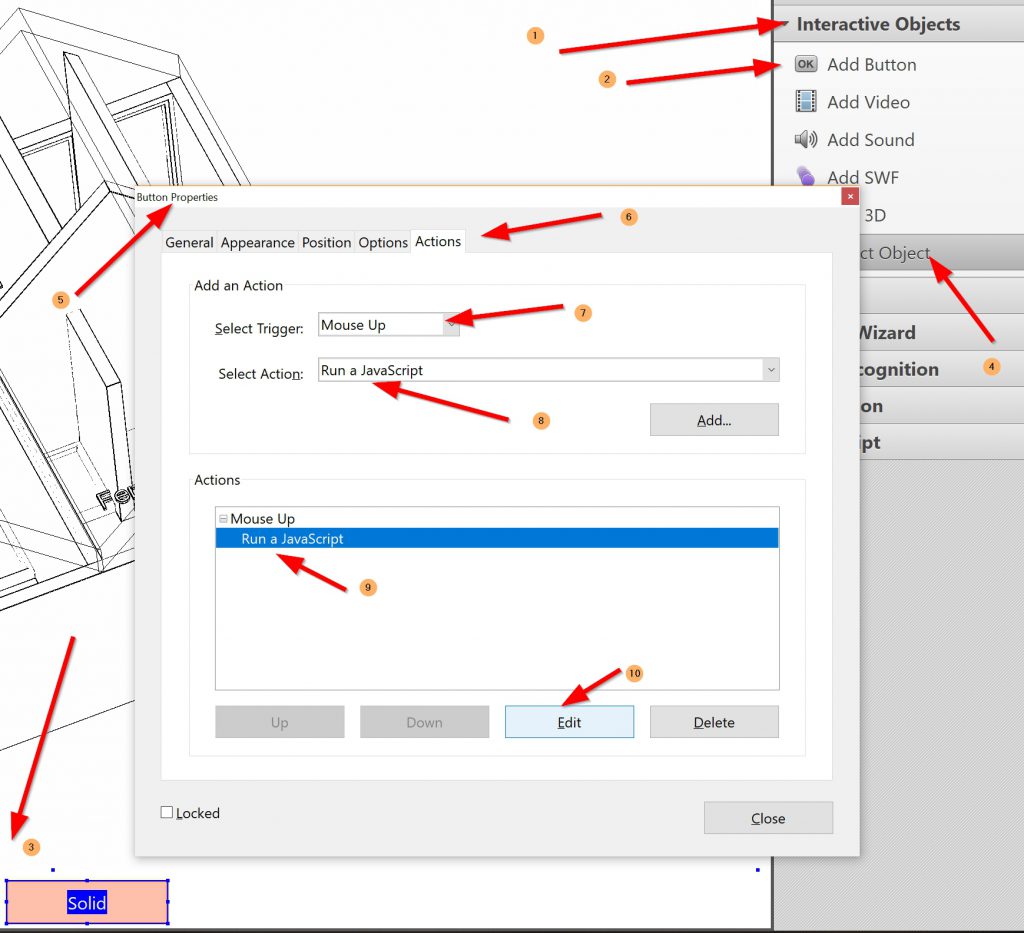
You use the Action tab to associate a JavaScript with an action for the button, in this case, on MouseUp it will activate the script. Inside this part, if you press edit it will allow you to write the JS code.
So after getting the button on the page and associating a JavaScript code to it we need to start debugging (well, that’s my experience of any code that I write/borrow or modify).
Debugging
I did come across this article The Acrobat JavaScript Console (Your best friend for developing Acrobat JavaScript) that was helpful.
You need to go into your preferences and enable the JS debugger, then it comes up as an option. You can also use Ctrl + J to pop it up as well.
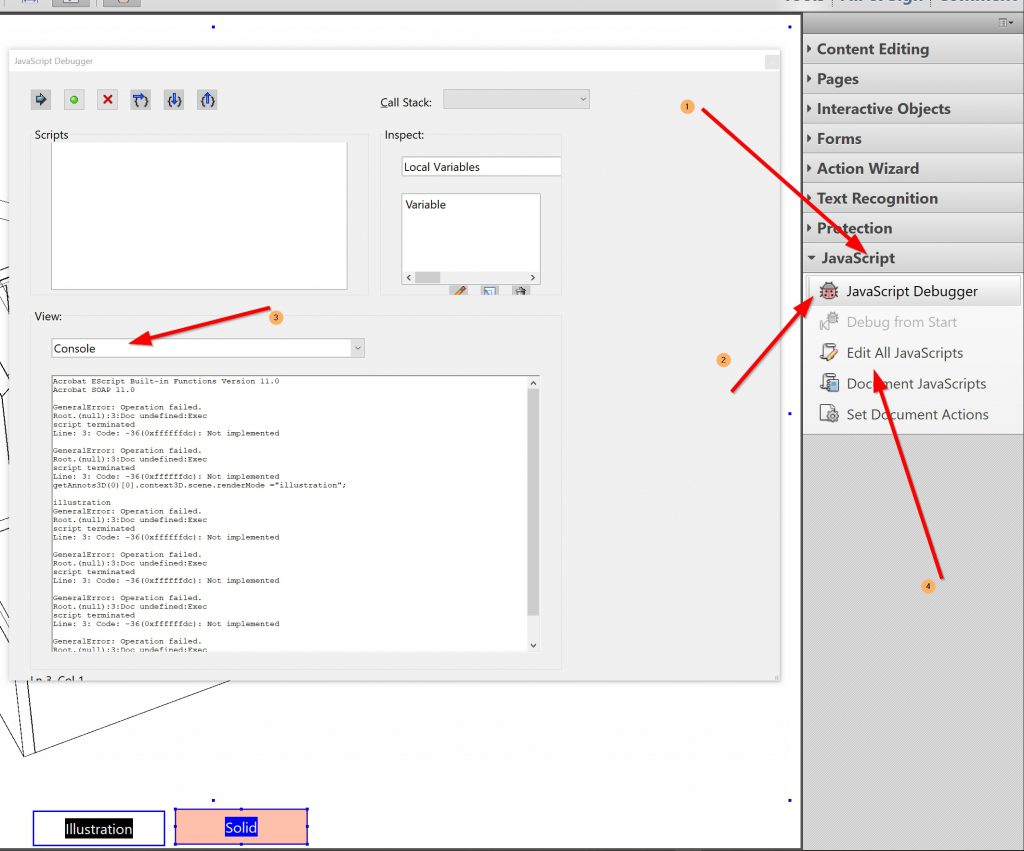
After I started doing the basic 3+4 and using Ctrl + Enter to run it on the console, I started to test some of the previous non-working code I had to test it. Things went a lot faster when I was just testing it in the console, and quicker to try several different codes examples until i got what I wanted.
Process- Turn Objects Off/On-part 2
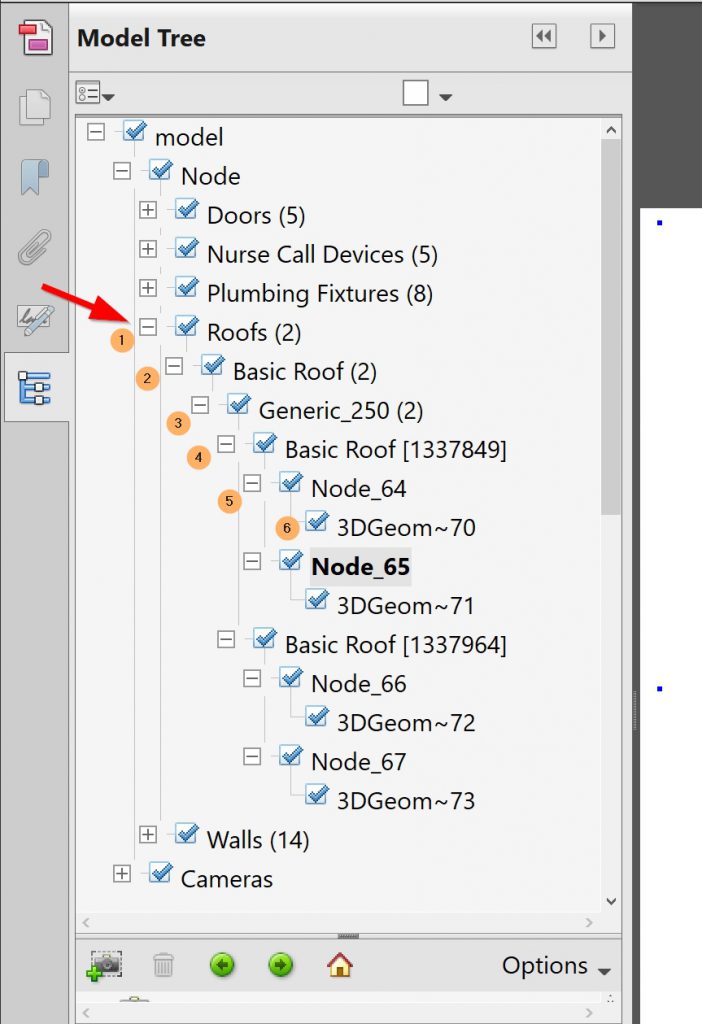
in the image above is the model tree. Top level model, then Node, then doors, Nurse call devices, Plumbing Fixtures, Roofs, Walls all at the same level of hierarchy in the trees, then these can be drilled down further.
So I thought, if I target Roof’s and turn that visibility off, then all below that will turn off too.
If you ticked the Roofs checkbox in the 3D PDF that is exactly what happens, but not so in JS
,All that happens is that particular checkbox goes off but the roof is still displayed in the model. So although you have the parent object, you do not have any of its children.
As there are two roofs, I had to go to the bottom of the tree for the roof and turn the 3DGeom~70 & 72 off. This still left the outline of the roofs , which were nodes 3DGeom~71 & 73. I could have added a couple of more lines to the JS to allow for these too, but I didn’t. So the JS for the button to hide the roof elements is as below, and to turn on, just change .visible= true for the objects.
getAnnots3D(0)[0].context3D.scene.nodes.getByName("3DGeom~70").visible=false;
getAnnots3D(0)[0].context3D.scene.nodes.getByName("3DGeom~72").visible=false;
So, I think you could turn them off at the Roof level, but you’d then have to loop through all the nodes below that and turn off all the nodes at each level below on the tree. An exercise for later, its taken me all day to get this far. The current method above is specific to this model and PDF, and if I was to do it for walls then I’d have 14 lines with different objects, so its not an efficient method of coding in its present form.
Changing Render Mode
The other code I found for changing what the model looked like was :
getAnnots3D(0)[0].context3D.scene.renderMode ="illustration";This takes the whole scene object and changes its rendering to illustration, and then the next button changes it back to solid.
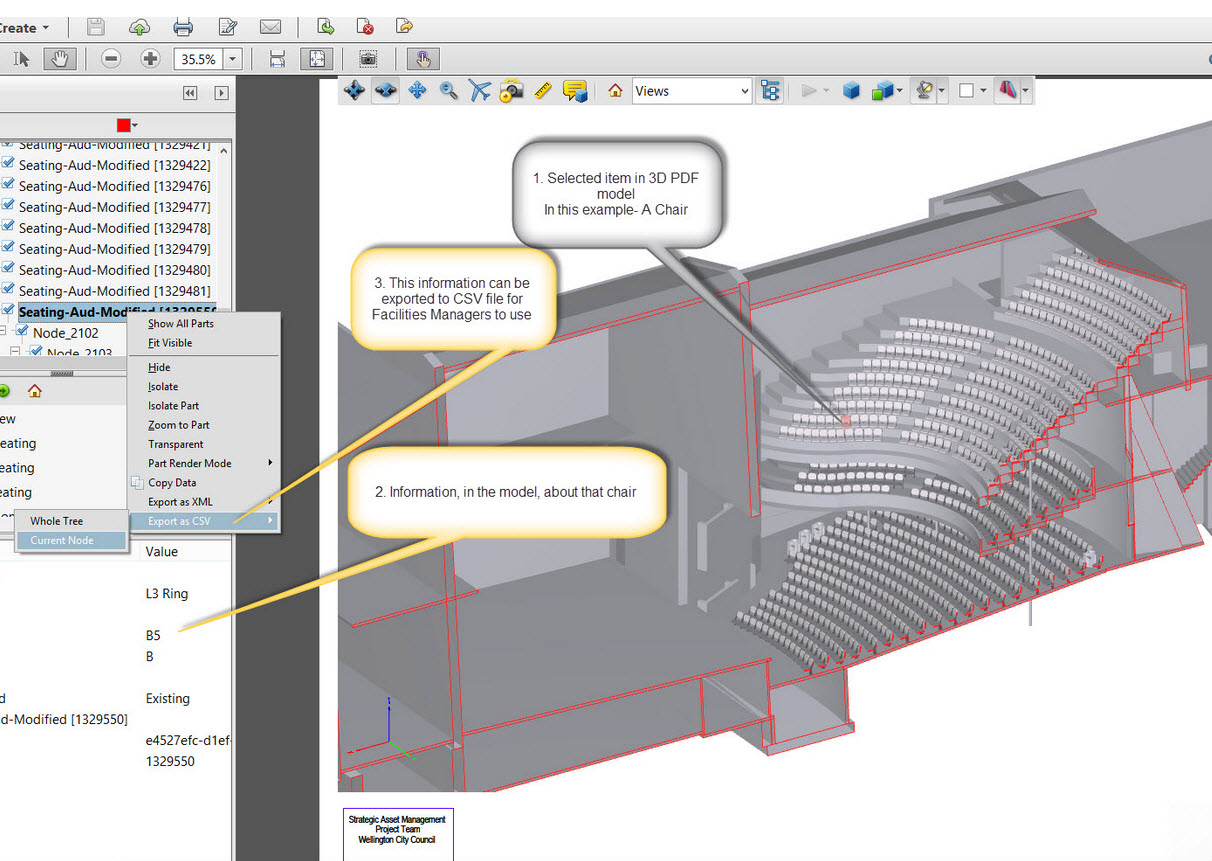
MetaData
var data= getAnnots3D(0)[0].context3D.scene.nodes.getByName("Basic Roof [1337964]").metadataString;
data;
The above code, when run in the JS Debugger console, will show the data associated with the roof object that you see in the PDF. This is what is exported to CSV for this object. Now how would I make use of that?
End comment
The JavaScript in 3D can act on the objects inside the 3D PDF such as the Nodes, but you are also able to use JS at the document level, for things like Print and other aspects of the whole document. I haven’t played around with those actions yet.
Overall I’m happy I’ve been able to get a bit of JS working inside a 3D PDF, but a bit disappointed with the level of actions that I’m allowed to do.
Now that I’ve got code running, the debug console operating I can try and get some more useful code that is able to be used over multiple PDF’s rather than it being so specific to this particular one. One small step for Max….. hopefully a giant leap for Max’s 3D PDF’s.
getAnnots3D(0)[0].context3D.scene.nodes.getByName("3DGeom~70").opacity=.2;The opacity is something that will be worth playing around with.
Also colour, this from this article Color Control on 3D object, I tried but it didn’t work, then used the code on the 2011-03-22 09:27:26 by sandigenco and it worked on the object
c3d = this.getAnnots3D(this.pageNum)[0].context3D;
matl = c3d.scene.meshes.getByName("3DGeom~70").material;

matl.diffuseColor.set( 1, 0, 0 );
On the next item he shows how to get all the meshes names.
c3d = this.getAnnots3D(this.pageNum)[0].context3D;
msh = c3d.scene.meshes;
for (var i = 0; i < msh.count; i++) {console.println("Mesh at index " + i + " name = " + msh.getByIndex(i).name);}
This prints out all the meshes in the console. TA mesh is A Node object that contains geometry. So when I ran the script on the PDF I’m using above I got:
undefinedMesh at index 0 name = 3DGeom~1
Mesh at index 1 name = 3DGeom~2
Mesh at index 2 name = 3DGeom~3
Mesh at index 3 name = 3DGeom~4
Mesh at index 4 name = 3DGeom~1_2
Mesh at index 5 name = 3DGeom~2_2
Mesh at index 6 name = 3DGeom~1_3
Mesh at index 7 name = 3DGeom~2_3
Mesh at index 8 name = 3DGeom~5
Mesh at index 9 name = 3DGeom~6
Mesh at index 10 name = 3DGeom~16
Mesh at index 11 name = 3DGeom~17
Mesh at index 12 name = 3DGeom~18
Mesh at index 13 name = 3DGeom~19
Mesh at index 14 name = 3DGeom~20
Mesh at index 15 name = 3DGeom~21
Mesh at index 16 name = 3DGeom~22
Mesh at index 17 name = 3DGeom~23
Mesh at index 18 name = 3DGeom~24
Mesh at index 19 name = 3DGeom~25
Mesh at index 20 name = 3DGeom~10
Mesh at index 21 name = 3DGeom~11
Mesh at index 22 name = 3DGeom~12
Mesh at index 23 name = 3DGeom~10_2
Mesh at index 24 name = 3DGeom~11_2
Mesh at index 25 name = 3DGeom~12_2
Mesh at index 26 name = 3DGeom~10_3
Mesh at index 27 name = 3DGeom~11_3
Mesh at index 28 name = 3DGeom~12_3
Mesh at index 29 name = 3DGeom~13
Mesh at index 30 name = 3DGeom~14
Mesh at index 31 name = 3DGeom~15
Mesh at index 32 name = 3DGeom~13_2
Mesh at index 33 name = 3DGeom~14_2
Mesh at index 34 name = 3DGeom~15_2
Mesh at index 35 name = 3DGeom~7
Mesh at index 36 name = 3DGeom~8
Mesh at index 37 name = 3DGeom~9
Mesh at index 38 name = 3DGeom~7_2
Mesh at index 39 name = 3DGeom~8_2
Mesh at index 40 name = 3DGeom~9_2
Mesh at index 41 name = 3DGeom~7_3
Mesh at index 42 name = 3DGeom~8_3
Mesh at index 43 name = 3DGeom~9_3
Mesh at index 44 name = 3DGeom~70
Mesh at index 45 name = 3DGeom~71
Mesh at index 46 name = 3DGeom~72
Mesh at index 47 name = 3DGeom~73
Mesh at index 48 name = 3DGeom~74
Mesh at index 49 name = 3DGeom~75
Mesh at index 50 name = 3DGeom~76
all the way up to
Mesh at index 87 name = 3DGeom~113
Mesh at index 88 name = 3DGeom~114
Mesh at index 89 name = 3DGeom~115
All of those from the Balina Bay Male/Female change rooms. Basically these are all the end points – So roof has 2 x 2 = 4, Walls have 14 x 3 , so there are variable numbers of geometry depending on the elements.
Also, a Function way to set the rendering is as follows (from code on page 9 on Reference book above
function setRenderMode( renderModeName ) {for (var i=0; i < getAnnots3D(0)[0].context3D.scene.meshes.count; i++) {getAnnots3D(0)[0].context3D.scene.meshes.getByIndex(i).renderMode = renderModeName;}}

setRenderMode( "illustration" );
When set that way, the buttons I created within the PDF don’t work.
8 more free productivity tools for Win10

Free Coda.io a great team productivity tool- Part 2