Creating free embedded automated quote for service with Google Docs
After writing a post on following a tutorial for automated invoice for a cake shop order, Free Google Docs online ordering automated I decided that, after migrating my Services to my Blog Site I’d try setting up an Automated Quote process for one of the services I offer, namely a Browser viewer for Panoramas linked to floor plans. This can be put on a flash drive and run from there via a browser.
So to start, I needed a google form embedded in the web page. This is pretty simple, it asks for Name & Email and what number of plans required as well as number of panoramas or photos that need to be linked to those plans and if any Hotlinks are required. 5 questions. At the top of the form there are prices for each so the person has an indication of costs but filling out the form they will get a confirmed quote that is valid for 2 weeks. Follow link to page.

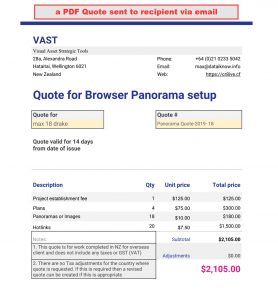
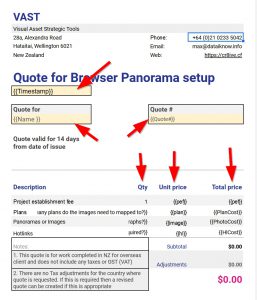
If they fill out and submit the form they would get an email outlining the process of ordering the service and payment method and also a PDF Quote as shown below:
The process follows the process of the Cake Shop example , but I ran into a few issues along the way when I tried to modify the process to fit my needs.
1.Driven to distraction editing auto saving sheet
This definitely drove me cracked. The auto saving in Google Sheets was “SO SLOW” that it took ages updating the formula in each column, so trying to correct the formula in say 10 columns took a massive amount of time. I was getting really really annoyed with it. It definitely disrupted my workflow as I’m not used to working at a snails pace. and YOU CANNOT TURN IT OFF.
On day 2 on this project I found out about OffLine sheets, but you need to be working in Chrome, not Firefox.
I think, once I linked the Quote Spreadsheet to the Form Response Spreadsheet that caused it to slow down an awful lot.
2. Cut/Paste in Google Sheets.
This was very frustrating too. There seems to be the Ctrl + C for copy & Ctrl + V for paste, if you try using the pull down menu it just refers to the hotkeys. So only one option, and that didn’t seem to work consistently and I found that pretty frustrating. All I could do is Ctrl + Z to undo and try again when it didn’t work. I had to add a couple of steps in like using backspace to delete an element. I still don’t think I’ve got a full understanding of this and the formula in the adjacent cell I was copying from would disappear, and I’m sure I was using Ctrl + C and not Ctrl + X.
3. Disappearing Functions as new row wiped clean any existing formulas
Either the Document Studio addon to Google Sheets or else transferring information from the Form, when creating a new line of data, seems to wipe out the whole row of data. So if you have a formula in empty cells on a new line in the main Google Sheet that gathers responses from the Form, they are all deleted.
This held me up for quite a while.
If I used this type of formula and dragged it down the column for empty cells:
=if(B2:B<>“”,PanoPrice!B3,)) ( a simpler way than=IF(NOT(ISBLANK($A2:$A)),PanoPrice!B3,)))
The formula in the cells on the same line as the new form data was created would become empty cells, so I couldn’t use formulas between cells.
In the video of the Cake Shop post the designer used:
=ArrayFormula(if(B2:B<>“”,PanoPrice!B3,)) and looking up the ArrayFormula() function seems to be the method to overcome this process. You write it in the first line and it populates down the sheet. There was little explanation of this in the video and when looking at it later it seems quite a powerful function.
I subsequently found the video below that explains what was happening and how the ArrayFormula() fixes it.
4. Vlookup
I started trying to add column on the main response sheet, with the subsequent problems of item 3 above. So I changed direction and used VLOOKUP in a pretty crude way, but it got the results that I required. I assumed that the maximum number of plans would be 50 , and maximum number of images and hotlinks as 1000. To do the 1 to 1000 in the column I used the following formula :
=ARRAYFORMULA(row(C1:C1002)) that worked fine for generating the count. In the next column where I worked out the price based on how many of them I used the formula :
=C6*$E$3 (the $E$3 says only look at that field, whereas the c6 changes to c7 … As you pull the blue dot in the right hand bottom corner of where the formula cell is.Also note, if you double click on the blue dot in the right hand bottom corner of the cell it will copy it down to match the columns to the left of it (if that is what the formula refers to- also note, if there is a gap in the rows with an empty cell, it will only go that far).
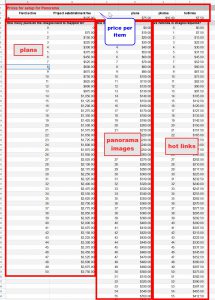
As I couldn’t do calculations in the main sheet I had to use the VLOOKUP tables to calculate the actual cost of the number of elements required on the 2nd tab and then transfer the calculated result across onto the main page.
I also put the prices on sheet 2 so that I only need to go to one location to change them (actually 2 as I need to change them on the form itself).
I wanted to be as transparent as possible and so on the Quote form it also has unit rate.
5. Quote Number
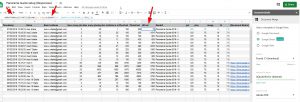
I wanted a UNIQUE number for each quote, so a quote number, this is the formula I used for that:
=ArrayFormula(if(B2:B<>“”, concat(“Panorama Quote-2019- “,row(J2:J)–1),“”)), the row(J2:J)–1 formula starts on Row 2, so 1 is returned and it takes the row number that it is on and subtracts 1. I put the text “Panorama Quote-2019- ” at the beginning so its clear which Form this is associated to. I also used it as the folder and file name with the persons name appended:
\\{{Quote#}} – {{Name}}
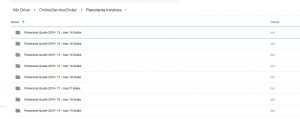
As well as for the PDF file name

6. Quote Template
All the column headers in the spreadsheet above can be used as {{VARIABLES}} in the Quote template.
The first time I tried multiplying Quantity x Unit Price I got an error as it was looking for a number and all it had in the template was variables.
So I had to create each of these in the main spreadsheet (see item 4 above) and bring them into the Template. Then it worked.
I had a little bit of an issue with some updates of the main spreadsheet (eg Renaming column headers) and those variables not working in the template – In the top PDF quote you’ll see that date is not showing.
I found re-linking the template (In Document Studio Addon, the top tab) to the main spreadsheet updated the variables to the correct ones.
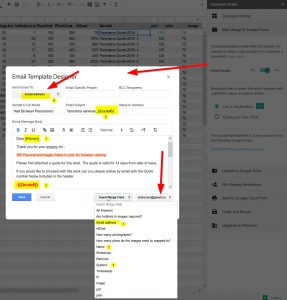
7. The Email
You can also use the Column header variables in the Email so they are tailored to the enquirer’s details.
End comment
I am very happy with the results, but it took a couple of days to get there with a lot of back tracking.
The video tutorial was one that took you through the process, making it sound simple, but there were a few underlying issues that needed explaining that were not. Still, I now have a list of them in this post so can refer to them for the next Automated enquiry form.
The next part of the process could be to send another form link specifically to the client ( in an email) where they can be more explicit with the information that they want to put in the plans and images and hotlinks and also give them a link to a shared google drive location so they can upload the files. This part of the process could also be automated too.
I could do some styling to the Form, email and the Quote sheet but I’ll leave that for another time.