Setting up a WordPress Woo Commerce site with Local by Flywheel Part 3
Continuing the development of the site, a few more issues came up.
Product Image Size
I had an issue with the product image proportions being more portrait than square, that didn’t suit the images I had made for the site. I have since found a setting in the theme that lets you adjust the proportions so I have been able to change the proportions to my requirements. That was nice as going into some of the code can be a pain.
Process Page
As the site is coming together I wanted to describe the process of getting the client query and giving quotes etc and how the workflow would proceed. I initially did this on one page but then thought that I would need to show the same process for multiple pages. Also, this process may change, so I will most probably be editing it in the future. This would mean going onto multiple pages and editing the process. Aaargh!
Best therefore to have a link to a process page from each Service (Product) item. Then I’d need to only go to one place to edit. Also, if some of the services are different I could either 1/ Outline the different processes on the same page, or give links to 2 separate pages. A much more logical approach.
I’m sure web designers sketch/storyboard these issues out at the beginning but as I’m only doing this site development work infrequently I appreciate that I will have to re-evaluate as I work on the project. In some ways the Architectural design development process that I’m used to, a preliminary design/developed design/construction documentation.
Buttons
So, I decided to use a button at the bottom of each Service (product) page to take one to the Process page. I looked for a free button maker add-in and found MaxButtons plugin. You put a bit of shortcode where you want your chosen button to be. A nice feature of this is the preview pane of the button on the right-hand side, so you can see your styling. (I initially was going to the page to test it but that slowed the process down).
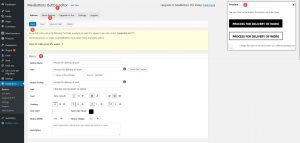 The free version does your basic button quite nicely, you can edit it to the style you want. The only issue is that it links to a URL. That is fine, to a point.
I will be having these buttons at the bottom of a few pages. They will take me to the Process page. Good.
BUT! How do I get back to the specific service page I started from after reviewing the Process page? This is usually the Back arrow in the browser, but I wanted a process from within the page. As I could have come from a number of different pages, the back button had to go to where I was last at.
I needed a simple method to get back to the previous page. You can do this in PHP, JavaScript & HTML. See this discussion (note item 7 has the HTML solution).
Either a PHP or JavaScript code snippet, thereby needing another add-in to do this for me or look at some sort of coding with only HTML.
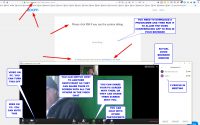
Why only HTML? Because Guttenburg editor allows for an HTML block in its block editor so here is the code I used. The button could do with a bit of padding, but it’ll suffice for now:
<p align=”center”>
<input type=”button” style=”font-face: ‘Arial BOLD’; font-size: larger; color: white; background-color: #222222; border:3px solid black” ;=”” value=”Back” onclick=”history.go(-1);”>
</p>
This is one of the things I find I spend a lot of time on tweaking, a real time waster for little return, fiddling with style and position of items, also button text size and font style etc. Too many things to play with. That is why having a pre-set Theme has its advantages to a point. There will always be a bit of extra tweaking to give it the individuality that you want. I’ve just got to find some templates that reflect my personal style to speed up the process.
Local by Flywheel
Another positive about Local is that you can still work when power/internet has gone down (as has just happened) so you can still be productive.
Something you need to be careful about. A workflow would be –
- Do work in Local,
- export to All-in-one-Migration-
- import with All-in-one-Migration to live site
- View in Browser (you can view in Local too)
- See issues. Go back to local, correct, re-do process from export.
You have to do all the work in Local or else export to All-in-one-Migration from Live Website back to Local (actually haven’t tried that yet) so do reverse migration process.
As you’d most probably just done minor changes it is a bit tedious. It is a single direction workflow.
I sometimes like reviewing my work when I’m out and about (sad man) and pick up something that I need to alter. I have to make a note of it so I can change it later.
With a live site, you can access it from anywhere so can tweak an alteration that is current. If you tweak it on the love site the next time there is an export from Local it will be overwritten.
So I think you need to think about doing the bulk of the work done in Local and then do tweaking on the live website and at some point exporting from the live website to local for a backup copy for any major updates. Again I’ll have to change my habits.
Coda.io
As a way of getting distracted from the task in hand, I found this free productivity and collaboration tool, Coda.io and wrote an article about it. It was initially a distraction from the work at hand but I decided to do an exercise on the steps I needed to do for this website and found it a good planning tool. It seems to have a basis in tables, these can be converted to Charts, GANT charts, Cards, and other visual formatting methods to convey information. It also has automated tasks (updating tables for new calendar evens, creating a row every time a new file is uploaded to Google Drive and sending notification emails of updates or changes to tables. I Will use this for further planning for building and checking the website.
When to stop with local by Flywheel?
I’ve been using Local for all the work on this site to date. I’m now at the point where I have most of the articles written and visuals at a point where I do not want to do much more to them.
A design decision was made, now complete it. I have posted the site to the live site, there are a few things outstanding:
- Checking the articles seeing if they scan OK.
- Tidying up the menu, taking off the checkout and cart (if possible)
- The Services options, tidying those up, there are a couple of blanks that I didn’t use.
I think it is time now, as this is mainly tweaked work to just work on the live site and do the last tidy up pieces. Towards the end, Local was getting a bit sluggish so I’ll see how it is working over the internet on the site.
So time to move on from building the site to looking to ways to market the services on the site.
Other items that also need addressing
HTTPS for the site
I had put httpS on the site but I still get a yellow triangle instead of a green padlock. On investigating further I saw on something I was playing with that some of my images had an http:// reference rather than a Https:// regference. So I looked on interwongle on how to do.
1. add a snippet to wp-config.php file
wp-config.php file to force all logins and all admin sessions to happen over SSL.
|
1
|
define('FORCE_SSL_ADMIN', true); |
2. Add plug-in WordPress HTTPS to the site then go onto each page and click on HTTP on side panel and click boxes for secure post and/or secure child post. Then when you go to the pages the padlock is green on the browser page.
A tedious process and all seems ok apart from one page. I’ll persevere with it.
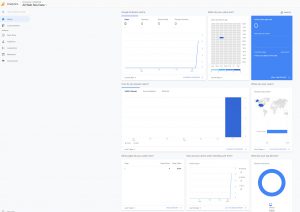
Google Analytics
I had to add this to the site. I don’t like plugins and just add the google analytics snippet to the header.php file right under the start of the <body> tag. I’ll have to wait a couple of days before I see any activity but I’ll test the site from different devices and monitor it.
Wednesday mid-day and after set up analytics tuesday its now up and running. Now I need a few visitors.
Google Fetch and Return
I wanted to have google add my site to its database for searches. I watched this video and added my site. Hopefully Google will crawl the site soon.
Getting rid of shopping trolly/cart and search button on main menu of the theme
I’m really liking the ShopIsle theme by ThemeIsle. They have a good document help file. I was searching to find a way to remove shopping trolly icon and search icon from the menu and they have a suggestion to load a plugin advanced-css and then they tell you what css code to add in their help file.
They also had something on adding icons to your menu. Using plugin menu-icons. They have a neat video on the plug in page to show how its done.
I’ve watched a couple of their videos, this one, and the one on the ShopIsle theme. I am quite impressed by their services.
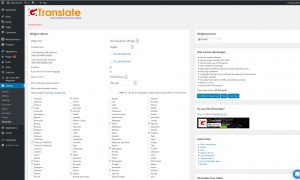
Google Translate
One button I like to use is Google Translate. It allows visitors to read the information tin their own language. I have noticed on my post site that I get quite a few visits from places where English is not the first language and would not be commonly used like South America, Indonesia and the Middle East. I think this is a great free plugin and would highly recommend it.
I have set it to Auto switch language to browser language (I haven’t tested it though) and also to give information to Google analytics so I can see which languages are being used when viewing the site.
End Comments
I don’t think I have a woo commerce site really, but using the process. Maybe it will develop into discrete packaged services that I can sell as a product in which case the Woo part may become operational.
A few things to think about and a few learnings along the way. And a good record for the next time I try building a site like this.
I have been impressed by Theme Isles shopIsle free theme and their services with help documents that are pretty comprehensive. Well done them.
I feel the front end is a bit slow, and that may mean a change of theme, but I’ll let it live and see what happens.
I will most probably update it to WordPress 5 when that comes out. As its near to WP 5 hopefully not too many glitches. I will be a bit nervous about some of my earlier sites, especially this post site. I’d better take another backup shortly.
Now I have to look at web scraping to find some leads to harass.
I wondered why, when I was back on the BIM machine, why a lot of websites only had a Contacts page and no email address, its to stop the web crawlers getting the information. The issue I had with that was most of the time I had images and files that I wanted to upload and their contact pages did not allow that to occur. So that meant sending a form through to them, waiting for a reply before I could actually send them the information. A bit of double handling and it really messed up my workflow. Why couldn’t they just have an upload button for files on their form?