Panorama file Hotspot setup using FREE Photo Sphere Viewer, plan link & tabs
The new photo sphere viewer by Jeremy Heleine allows you to put Markers on your Panorama . See demo here. I think that is pretty cool and I wondered if you could make them into Hyperlinks to link other panoramas to make a virtual tour. So I did some tests.
My previous way to be able to explore a building room by room was to have a PDF drawing with hyperlinks. As the hyperlinks opened in a web browser you had to switch between the PDF viewer and the Browser. A bit of a nuisance. So hyperlinks inside Panoramas seemed to be the way to go.
See the final result HERE.(very large file sizes so SLOW to load)
The code to add a marker is in JavaScript:
* Create a new marker when the user clicks somewhere
PSV.on(‘click’, function(e) {
PSV.addMarker({
id: ‘#’ + Math.random(),
longitude: e.longitude,
latitude: e.latitude,
image:’../pin3.png’,
width: 32,
height: 32,
anchor: ‘bottom center’,
tooltip: ‘Generated pin’,
data: {
generated: true }});
Note in the above example that the position is defined in latitude & longitude. In the photosphere viewer programme:
Latitude is defined as-π/2 and π/2. , with 0 being the centre horizon.
Longitude is defined as 0 and 2π. 0 to 6.28…, where I think, one edge of the image( the left) is 0 and the right edge of the image (the right) is 2π.
So you could try and work out where on your image the actual location of the Marker you require should be placed.
Another method of describing a location is by Pixels on the image using x, y coordinates:
// html marker utility
id: ‘text’,
x: 4981,
y: 1349,
html: ‘CLICK <a href=”Ground Utility.html”><font color=”FF00CC”><h1>⊕</h1></font></a> HERE’,
anchor: ‘bottom right’,
scale: [0.5, 1.5],
style: {
maxWidth: ‘100px’,
color: ‘white’,
fontSize: ’20px’,
fontFamily: ‘Helvetica, sans-serif’,
textAlign: ‘center’
},
tooltip: {
content: ‘An HTML marker’,
position: ‘right’ } },],});
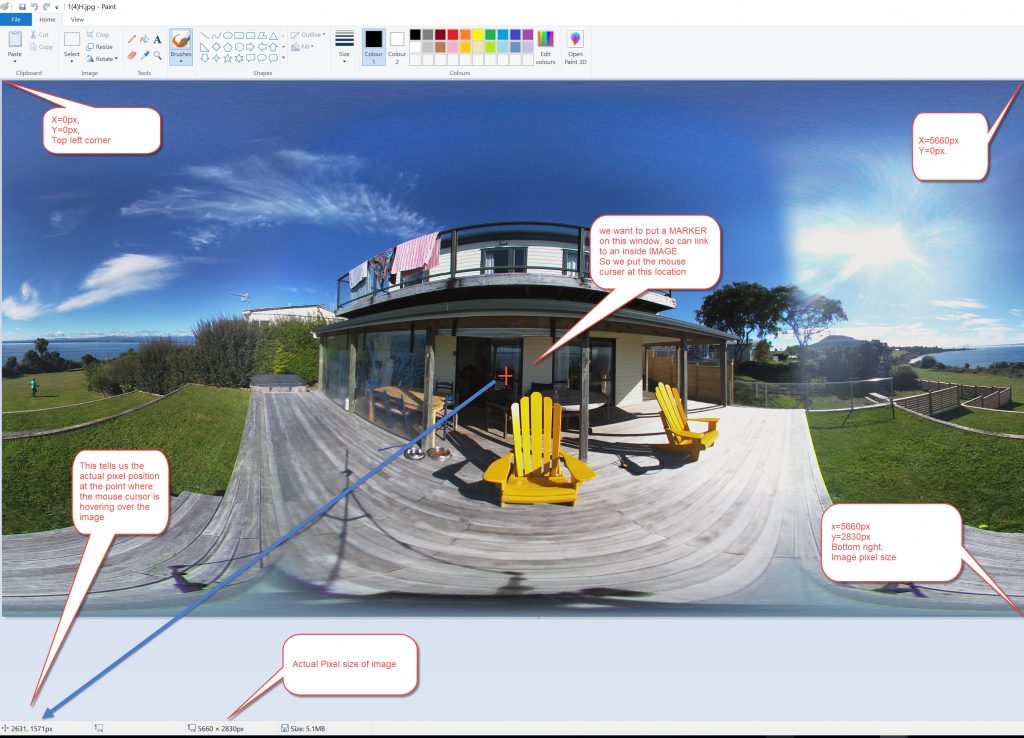
With this method, you need to know the overall size of the image (eg 5000px, 2500px). With images, 0px,0px is in top left corner of image & 5000px, 2500px is in bottom right corner of image. Then find the pixel point location that you need on the image eg 2000px, 1100px.
Using Panorama to get location
The process of displaying the image for spherical viewing distorts the image. So trying to workout pixel or longitude location from the Panorama is a matter of lots of trial and error. So not an efficient method of getting the location. The “X” or longitude is particularly difficult in the sphere as where is the LEFT HAND EDGE? The start point.
Using PAINT to get x,y pixel location
To get these points you need your image flat to be able to work out the location that you need.
Open the image in “PAINT” programme and this will show you the pixel coordinates at any point on the image.
Examples in Panorama
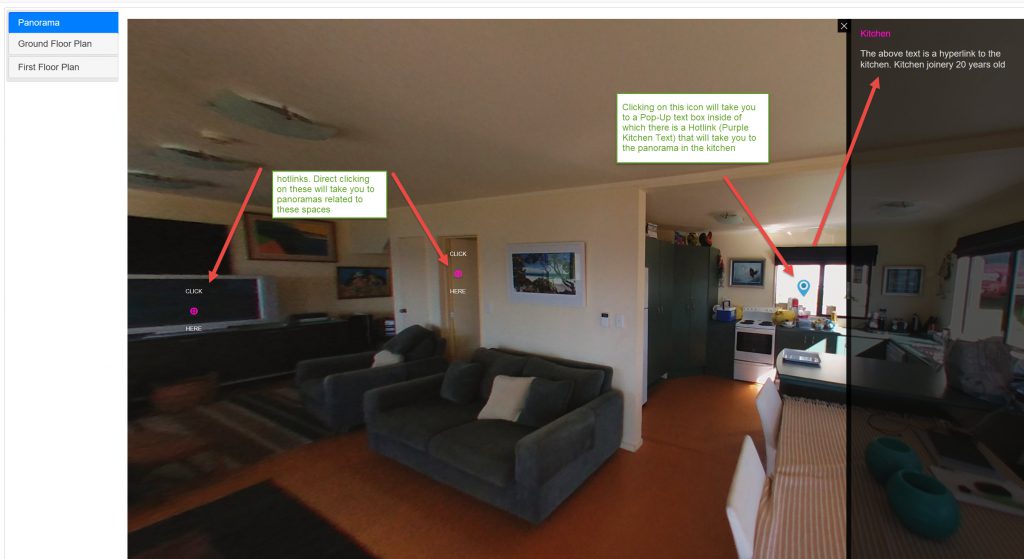
The example below shows 2 types of hotlinks, the small purple circles you click and directly go to the link, the blue icon (in the kitchen) first takes you to a pop-up text box which has a hyperlink nested within. The former is the more direct method. See this link.
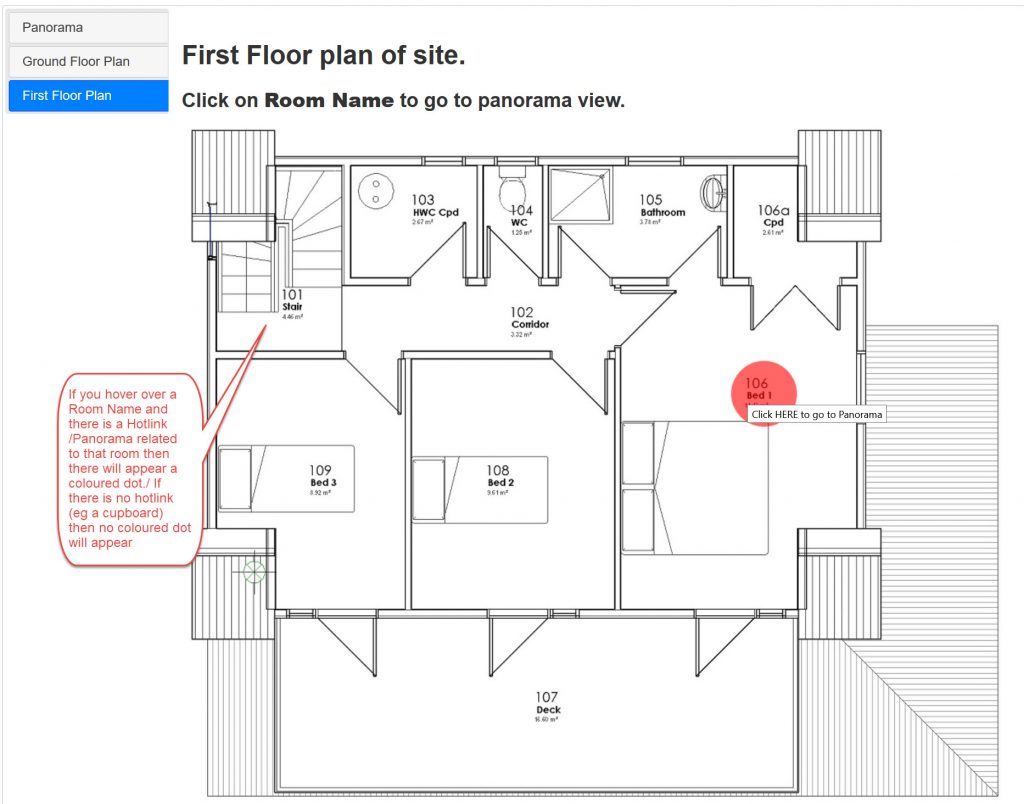
As you can see, there are tabs on the left of the web page above. In the other tabs are plan images of the property, one for each level. I have used the process for making markers in the Panoramas and used the process for flat plans. In this instance, if you hover over a room number/name tag you will see the tag turn red, this indicates that there is an active link to another Panorama. If you hover over a room number/name tag and it does not turn red then it indicates there is no active link (eg a cupboard).
In the example of the flat image above I had a problem with scaling. The Image may be say 1700px wide, and I wanted to display it as 1000px wide on my web page, I would then have to take all my X/Y pixel coordinates and multiply them by 1000/1700 (0.588) so that the coordinates would relate to the reduced image size. An alternative method was to first scale the original image down from 1700px wide to 1000px then find all the X/Y points. That way I didn’t have to calculate all the modified coordinates.
The hover hotspots were not easy either, I thought I could just define a color in the html <area> tag, but that was not the case. I had to use a JQuery Plugin called maphighlight to get that to work. eg:
<area href=”Ground Dining.html” shape=”circle” coords=”727,506,40″ alt=”Dining” data-maphilight='{“stroke”:false,”fillColor”:”ff0000″,”fillOpacity”:0.6}’ title=”Click HERE to go to Panorama”>
Tabs in Web Pages.
Although I am currently interested in Python, I had to take time out to revisit JavaScript as the web page needed events to take place and JavaScript is the programme that does this. I watched the JavaScript Tutorial for Absolute Beginners with Bob Tabor who does the teaching at a good slow pace. In the course he moves from raw JavaScript to JQuery. In the JQuery section for plugins he demonstrated the Tabs on the webpage that I thought would be quite useful in the way I wanted to display the Panoramas and also reference other panoramas, not only by hotlinks within the panorama but also on plan as well.
To do this I used the JQuery Ui Tabs Plugin.
I had initially looked at learning JavaScript so that I could get the location of coordinates within a panorama using the “create a new Marker” example in the code above. As you put a new marker onto the panorama I wanted to be able to get either the Longitude/Latitude or X/Y coordinates to set up the hotlink. I have not done this to date, but if I get any projects to do some Panoramas I may look at revisiting that.
Coding & Relative Pathing
As I wanted to be able to make these Panoramas transportable instead of referencing the JQuery code from the website, eg:
<script

src="https://code.jquery.com/jquery-2.2.4.min.js"></script>
I downloaded minified versions of the code and used relative paths, eg:
<script type=”text/javascript” src=”../jquery-3.3.1.min.js”></script>
This makes the directory size larger as it has a lot of minified code as well but it has 2 strengths:
1/ It is transportable, so you can copy to USB, another PC or onto a LAN or VPS.
2/ If you have the code working , it will work! That sounds daft, but the original https://photo-sphere-viewer.js.org/ link was updated, so my web pages were calling for the old code but got the new code and broke. As you don’t know when these updates are going to occur this could bring down a demonstration that you had set up (which it did on 3 web pages that I have found so far, so I had to quickly re-code them).
End comment
A few challenges along the way for setting this up, but I am definitely pleased with the results. I still have a bit of learning with JavaScript to get the coordinates but I did find out about JQuery and that is not as scary a I thought it would be.
I am pleased with having the panoramas and plans on the same web page in different tabs, it makes it so much neater than the PDF and browser setup I had previously.
The learning from Python for being able to automate part of the setup also speeds up the process too and makes it much easier to use.
CAD Data to Excel for Asset Management
A members only office/team resource WordPress website Part 1
