RTV Reporter Pro Export Category to Database
RTV Reporter Pro Setup has interface in Revit & Database behind.
Database to be called RTV_ReporterPro_SPM to have connection. If it does not exist it is supposed to Create it (when you start RTV Reporter Pro in Revit for first time), but it errored out when I re-named the original one and tried that.
Inside Revit, there is Tab for RTV Tools. Under that is Reporter Pro (left hand side).

When you open RTV pro it shows you the HOME tab.
This is the interface that External consultants would have. They would not have the SETTINGS tab.
- Speed up the tedious stuff and enjoy designing and documentation more
- Works in all versions of Revit
- Information to PROVE your increased speed
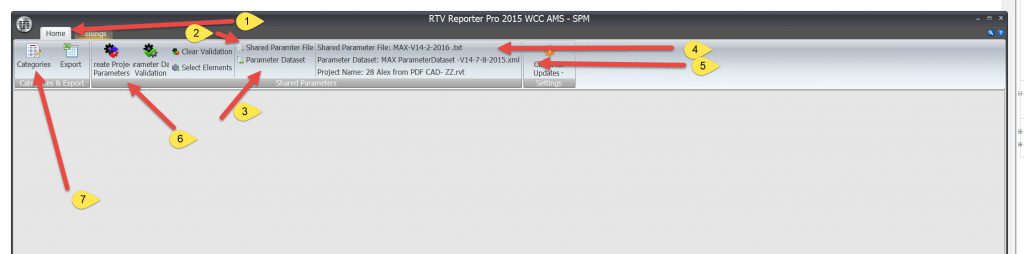
In the HOME tab, you’d click the Category Button and choose 1 or More Categories that you wanted to populate.
You must Have the 2 files Shared Parameter File & Parameter DataSet.
Shared Parameter File is the Shared Parameters that have been set up, specific to clients requirements. If you click Item 6, Create Project Parameters this pushes the Shared Parameter file into your Model.
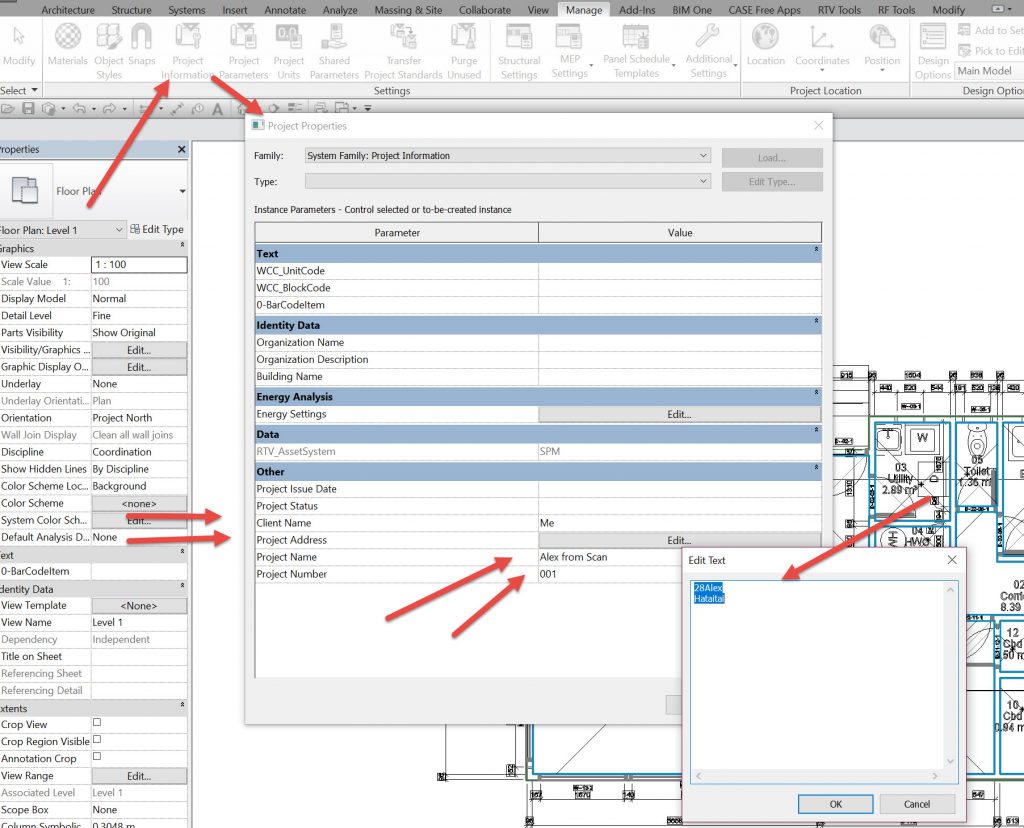
I just want to jump across to the SETTINGS tab.
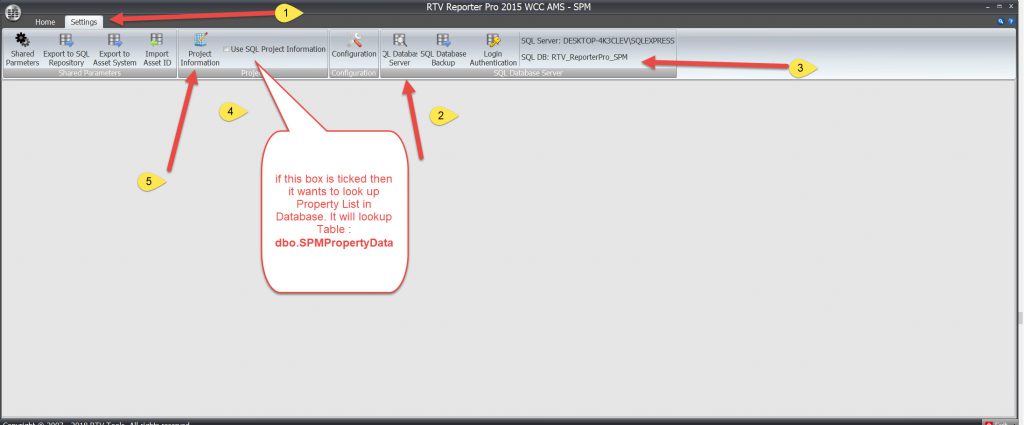
This is the Clients interface that will take the designer/contractors model and push the information into the Database.
Item 2 is the SQL Database Server, you will see that Item 3 is the Database instance, RTV_ReporterPro_SPM, so correct database is linked to Revit.
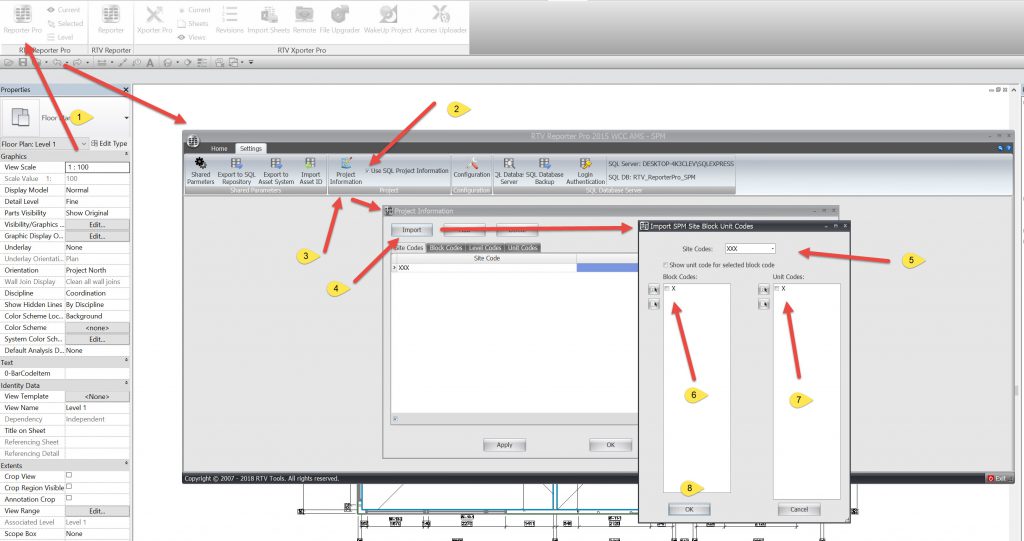
You need to set up PROJECT INFORMATION first before you can Export to SQL Repository 2nd button on the left.
There are 2 methods to do this.
METHOD 1
1/ Lookup Table where you lookup the SITE CODE in the database table ( dbo.SPMPropertyData). YOU HAVE TO TICK the BOX for USE SQL PROJECT INFORMATION. It will look up Site Code and show you the BLOCK & UNIT CODES associated with that site. You then click on the ones that the model is associated with (or multiple units) and it will associate THIS FILE/MODEL (actually file name) with your selected codes.
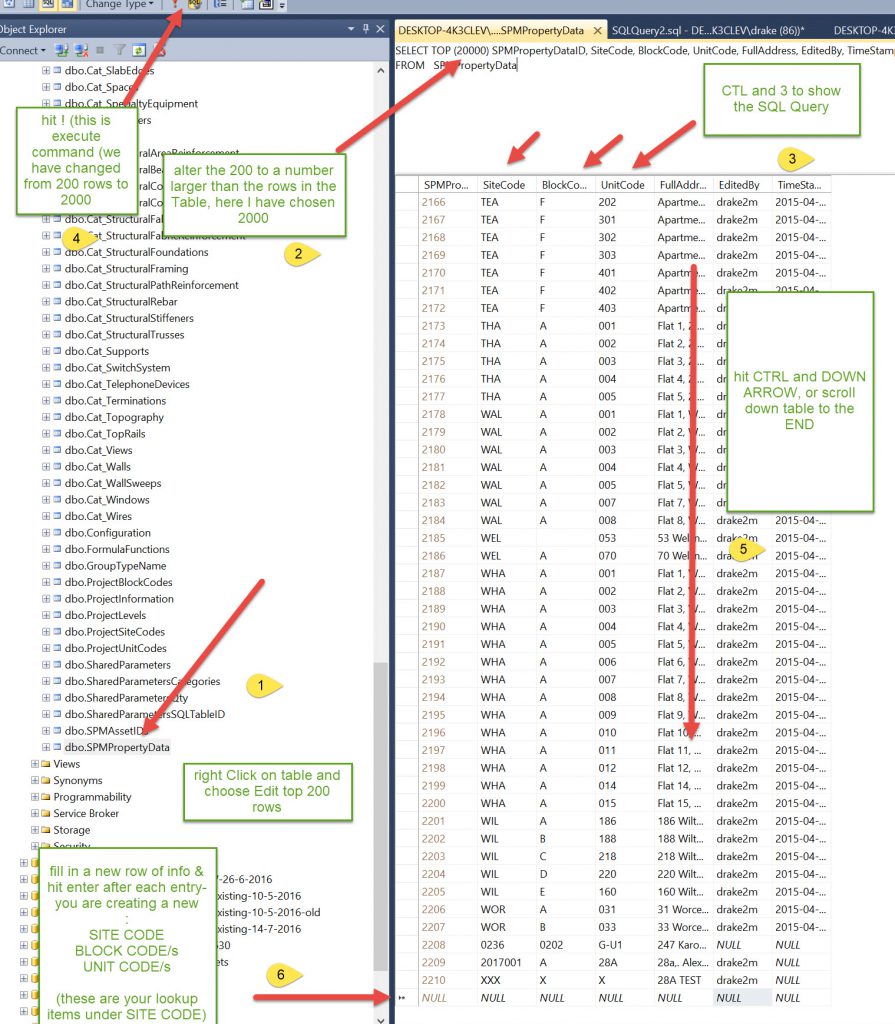
Select RTV Reporter Pro, go to SETTINGS tab, Click on USE SQL PROJECT INFORMATION, Then open Project Information, Select IMPORT BUTTON, Type in SITE CODE and tick appropriate BLOCK & UNIT CODES, Click OK button. When Pop U p IMPORT panel Closes, hit APPLY & OK in the Property Information Panel.
Then Close out of RTV Reporter Pro, Save Revit File , then open Up RTV Reporter Pro again and select categories in HOME TAB
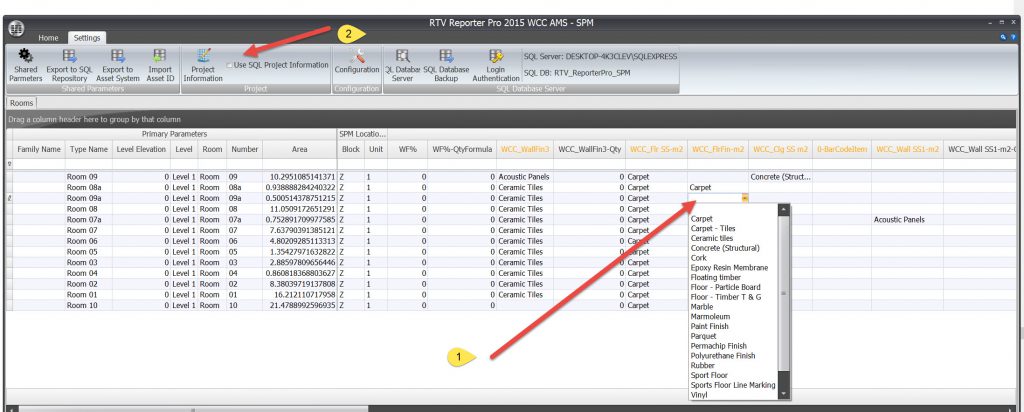
Now when you go into a category (Room Category in example below) you can only fill in Pre-Selected Block & Unit codes.
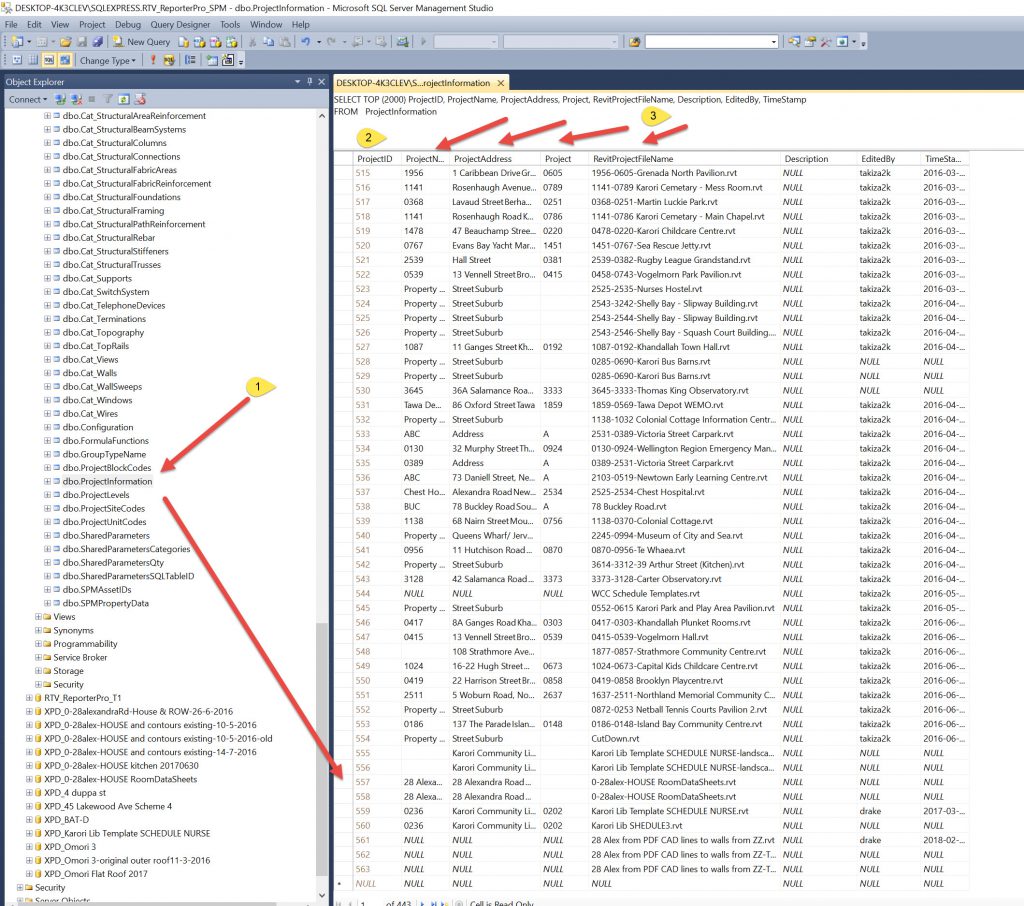
These Codes have now gone into the following tables in the Database:
- ProjectInformation
- ProjectSiteCodes
- ProjectBlockCodes
- ProjectUnitCodes
The project information table holds data on the Project information of course, and the MODEL FILE NAME see below. The KEY NUMBER, ProjectID is the code for linking all 4 of the above tables together that are associated with the MODEL FILE. So if you want to create a new dataset just name the model to a different name and it will re-create the data set.
Method 2.
This method assumes that there is not a Preset list to choose from for your Building. So you are filling in a NEW set of SITE/BLOCK/UNIT codes.
So you will be filling in the Project Information from the SETTINGS tab without the USE SQL PROJECT INFORMATION being selected.
So for this to occur we Start RTV Reporter Pro, Go to Settings tan and choose Project Information Button.
We then Go to the SITE CODE tab, select ADD button, and fill in SITE CODE and select APPLY (actually you can hit the apply button after you have done SITE/BLOCK/UNIT codes).
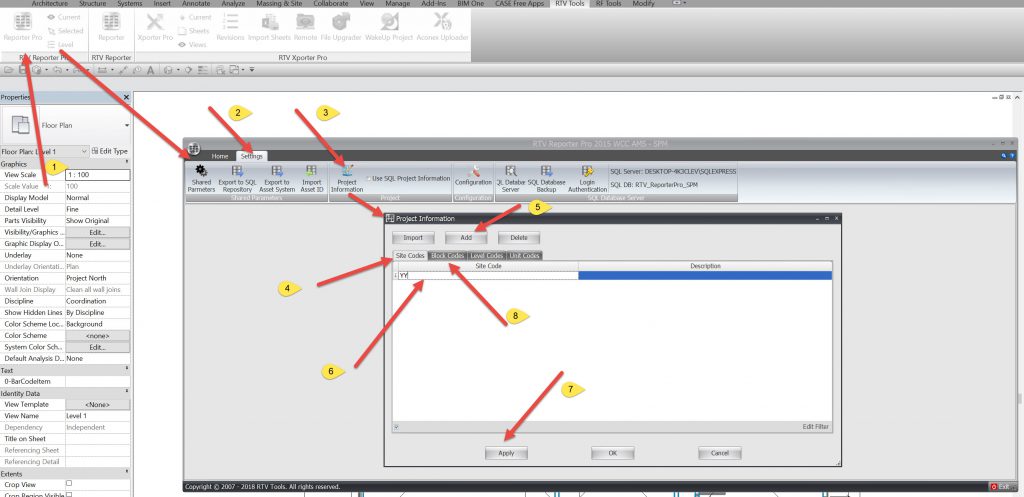
Then go to the BLOCK CODE tab and click ADD button and fill in BLOCK CODE. then hit APPLY button.
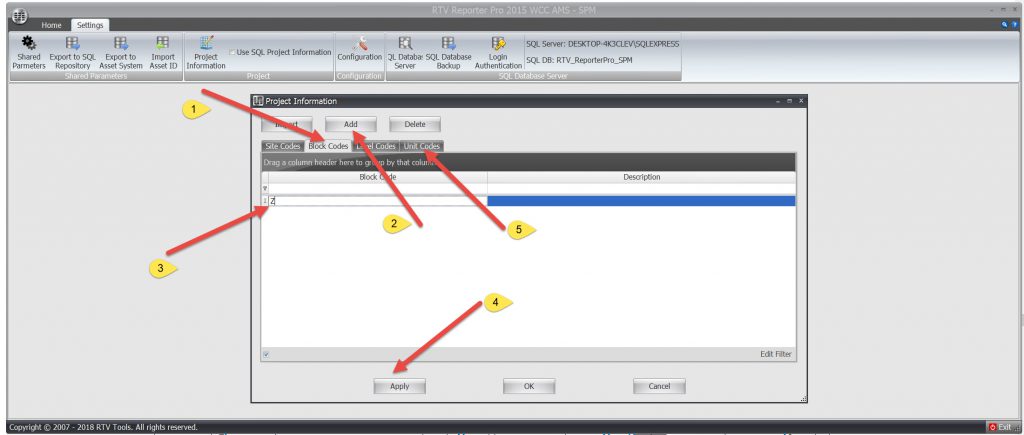
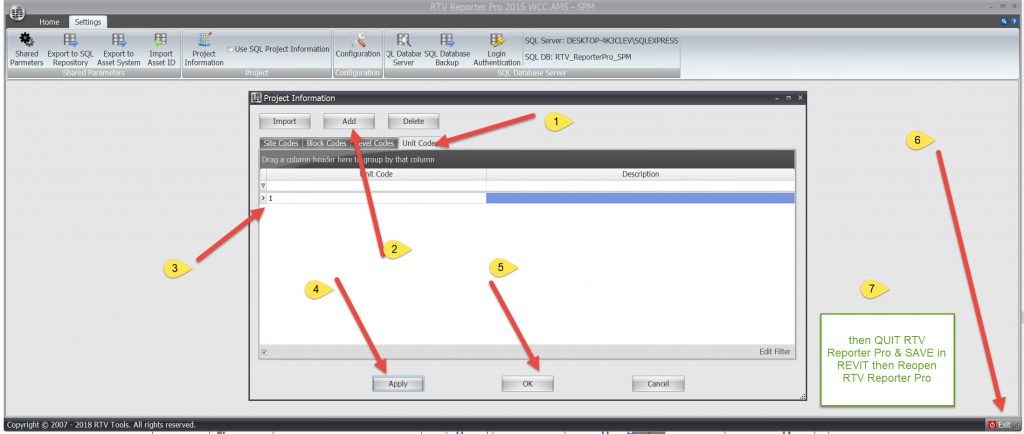
Then go to UNI*T CODE Tab and ADD button and fill in UNIT CODE and click APPLY button and OK button.
(There is a TAB for Levels but we did not choose to use levels as another Identifier, so not required for the process. )
Then Exit from RTV Reporter Pro and SAVE in Revit. If you open up RTV Reporter Pro again and select a CATEGORY/CATEGORIES then you should , in the pull down menu for BLOCK & UNIT be able to choose the CREATED block & Unit codes. This should also allow you to EXPORT to SQL Repository for the particular Model File Name.
If you update the Category Tables, those updates will be exported into the Database.
( note, after setting up the new SITE/BLOCK/UNIT codes and exiting RTV Reporter Pro and Saving in Revit the pull down did not work, I was getting residual information. SHUT down REVIT and ReSTART. Then it worked fine.
SPECIAL NOTE
For the pull down pick lists to work (they are calling the PARAMETER DATASET file in the HOME TAB) you need to ensure that the USE SQL PROJECT INFORMATION button is NOT TICKED!
This button says either READ the DATABASE (Ticked) or read the uploaded files (UNTICKED). As we are filling in data from the PARAMETER DATASET file we do not want the programme to go looking in the database for the information ( especially since the Designers/Contractors do not have the database hanging off their instance of the programme).

Forum for mutual help
How to use Image Mapping Plugins for Property Site with WordPress