Google Sheets Macro Recorder & Web App
I need to get my head around this to see if it can supplement the sheet filtering info I was exploring in the last post.
Formatting Macro tutorial
I will be following the tutorial in the video below, it is one of the videos from the Learn Google Spreadsheets that I think is an exceptional series.
The bit that interested me was the table formatting near the end of the video, the fact that you could use it on any table size as long as you didn’t use specific cells by dragging the mouse to select them but used Ctrl + Shft + Down Arrow (or Right Arrow ) to select all non empty cells in the column or row to navigate through. When recorded, this macro would then work on any size spreadsheet as long as cells in row 1 and column A had continuous filled cells to the end.
This will give a consistent styling to parts of the spreadsheet so you can have a signature style for them.
I did a preliminary test using absolute references in one spreadsheet. I saved it and then when I went to a different spreadsheet to try it out there and I couldn’t access it.
I could see it it in my scripts home location. And if I clicked on the pencil I could be taken to the Script.
It seems, as I can figure out so far, that the macro is bound to the sheet. So, you could add another sheet in that spreadsheet, get another table and run the macro. That’s fine, but not very transportable.
You can create a new app script. Here is an example of formatting with alternative colours (gray) . It starts in Cell A1 – selects top row (continuous filled cells along top, formats top row as BOLD, then selects calls down to bottom of filled rows. Then selects alternative colours formatting on that range. Then it selects all the headers and adjusts width for automatic width.
function FormatAlternate() {
var spreadsheet = SpreadsheetApp.getActive();
//spreadsheet.getRange(‘A1:F18’).activate();
//spreadsheet.getRange(‘A1:F18’)
spreadsheet.getRange(‘A1’).activate();
var currentCell = spreadsheet.getCurrentCell();
spreadsheet.getSelection().getNextDataRange(SpreadsheetApp.Direction.NEXT).activate().setFontWeight(‘bold’);
currentCell.activateAsCurrentCell();
currentCell = spreadsheet.getCurrentCell();
spreadsheet.getSelection().getNextDataRange(SpreadsheetApp.Direction.DOWN).activate().applyRowBanding(SpreadsheetApp.BandingTheme.LIGHT_GREY);
currentCell.activateAsCurrentCell();
var sheet = spreadsheet.getActiveSheet();
sheet.getRange(1, 1, sheet.getMaxRows(), sheet.getMaxColumns()).activate();
spreadsheet.getActiveSheet().autoResizeColumns(1, 42);
};
Getting the macro to another spreadsheet
I have done some fossiking and the crude way of getting the macro to another Spreadsheet is as follows, it seems rather convoluted to me, but it works.
- Go into the Spreadsheet that you want the macro to be in to use
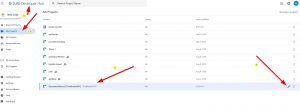
- Click on Tools> Script Editor. If there is already a macro in that spreadsheet then it’ll take you to the code. Click on the “blue arrowy thing” in top left corner, that takes you back to https://script.google.com/home/my
- Click on my projects text in left sidebar, this should bring you to a list of the apps and macros that you have created. Look for the macro or script that you want in the spreadsheet.
- Record a basic macro in it. Go to Tools> Macros > Record Macros
- Create a simple macro , say click on one cell and reformat to text to left and save. Save file as what you would like new macro to be named.
- Go into Tools> Macros >Manage Macro and open it up to edit. Delete what is in the code.gs file
- In item 3 above, copy the code from that macro and paste it into the one in your new spread sheet,
- Save it.
- Go to Tools> Macros >Import
- Find the macro and pull it in, or else it may be listed under the import button
Here is the link to the Google Sheets Macros page, that gives you the general idea.
Google Sheets Web App
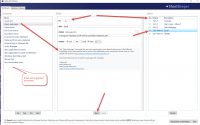
This is another cool tutorial. Note: pay close attention about revisions, I’ve been going in iterative loops on that as I have not been updating correctly so keep testing the older version, or USE DEV mode.
On an earlier post Google Forms File Upload-not meeting my need, as a next step in an automation process Forms didn’t do the job that I needed, possibly using a web page to gather data and send a link to that page would be an alternative method of getting the process running. Maybe not, but its worth becoming familiar with the App Script methods of deployment and coding
From the video above I got the following code to work:
code.gs ( This takes data from Web page (name, email address and puts them in a spreadsheet with a timestamp)
function doGet(data){
Logger.log(data.parameter);
return HtmlService.createHtmlOutputFromFile(‘Index’);
}
function userClicked (name, mail){
var url= “https://docs.google.com/spreadsheets/d/XYZ>>>>>>>>>>>XTY/edit#gid=2098969877”;// Put in the URL of your particular spreadsheet
var ss = SpreadsheetApp.openByUrl(url);
var ws=ss.getSheetByName(“WebForm1”);// Put in the specific sheet name of your spreadsheet
ws.appendRow([name, mail, new Date()]);
//Logger.log(name “Clicked the Button”);
}
Index.html ( This form takes Name & email address)
<!DOCTYPE html>
<html>
<head>
<base target=”_top”>
</head>
<body>
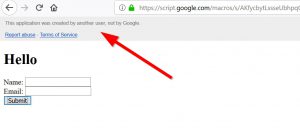
<h1>Hello</h1>
<label>Name:</label>
<input type=”text” id=”xname”><br>
<label>Email:</label>
<input type=”text” id=”email”><br>
<button id=”button”>Submit</button>
<script>
document.getElementById (“button”).addEventListener (“click” , doStuff);
function doStuff(){
var uname=document.getElementById(“xname”).value;
var mail=document.getElementById(“email”).value;
google.script.run.userClicked (uname, mail);
// THESE NEXT ROWS LEAR THE WEB PAGE INPUT FIELDS BACK TO BLANK
document.getElementById(“xname”).value=””;
document.getElementById(“email”).value=””;
}
</script>
</body>
</html>
The coding of the process for the Web App
Although I had used KEEP to copy the code from YouTube I was a bit inaccurate in my editing, things like “ur1” instead of “url”.
I spent so much time debugging that I pretty much re-wrote it as I played the video and paused. JavaScript, I find, is not very forgiving with errors and does not tell you much about them. I’d forgotten about that.
I had problems with the logging not showing up so had to go back to debug that too. It took far longer than I expected. It also does not have any data validation in it at this time.
Also the header at the top of the page has some Google text and disclaimers , which is not too pretty. You can embed this in a Google Web page but not in a WordPress one.
I also found with the link I sometimes had to refresh it a couple of times before it’d show up.
 End Comments
 End Comments
Macro’s
I thought the Macro recording process was quite easy, the chap from Learn Google Spreadsheets is a great teacher and his highlighting of different methods to use with Ctrl + Shift + Side & Down arrows is a quick way to use, rather than hunting for the code for those features (eg End of Row).
I thought the fact that the macro’s are linked to the sheet is a bit of a pain, but its not too hard to cut/paste into another macro in a new sheet, but you need to be organised and remember in which sheet the macro originally was. Possibly making them App Scripts may be an easier way for cut/paste into spreadsheets.
I’d definitely be using that process some more. It really is nice.
compared to other Macro programmes that have to find and activate windows and know what size they are , like AHK and AutoIT it is much simpler.
Web Apps
I was struggling with getting the simple app to work. I think my JavaScript and debugging processes have rusted a bit. Once I pulled back and worked in a methodical way though it all came together.
For simple forms using Google Forms is the way to go, it has so much of the fundamentals including validation embedded so easier to use in first instance.
I can see the potential for this method and also you can make more bespoke features to interact with different Google Docs programmes. I will have to watch a few more videos about Apps integration and deployment to see whether to commit more energy to it.
What I do like is that it has the potential, for me, to extend the simple automation that I have setup so far with forms, spreadsheets and their add-ins and that may encourage me to get to grips with Apps scripts more.
Productivity tools in windows 10. Tips, tricks & some free programmes

AHK Script on Start & PowerShell Send Email